Introduction
Some of the officer functions within the club are helped by providing access to a limited set of functions within the WordPress administrative function set. This is accomplished by providing separate logins to be used by those people; these logins have “Author” capability. These login accounts have extra capability to edit various items within the system.
The intent is to allow users to directly control their content rather than requiring a middleman to make the changes. If you prefer to send the webmaster changes to be made, that is certainly not a problem.
For example, the Grand Canyon Star Party coordinator needs to regularly update a couple of pages describing procedures and dates for the event. He will now be able to directly edit those pages without needing to indirectly work through the webmaster. Of course, the webmaster is able to help in the event of problems.
The coordinator does not have editing capability on other pages, or the internal configurations of the site. Hopefully, we don’t need to worry about inadvertently messing up the site.
Logging In
Logging into the system is accomplished by clicking on the small key icon at the upper right of the screen.
A Login screen comes up asking for your login and password. I have sent your information separately.
Once you are logged in, the site looks slightly different.

A black bar is added to the top of the screen. Within it are several menus.
- On the right is your user information. Hovering over your name brings up a menu, which includes the Logout button.
- On the left is the Site name, which also drops down a menu to enter the Dashboard administrative section of the site (described in the next section).
- Also on the left are editing functions. In this case, “+New” opens a menu to allow adding various new items – Post, Page, Media, and Event. Do not use the Media option; the better way to add images is described in another Instructions page.
In addition, a new menu item “Site Configuration” is added to the header menu. This provides convenient access to a couple of tools rather than going through the Dashboard.
The Dashboard (Back End)
Clicking the Dashboard menu item (left side of black bar) brings up the Dashboard. This is commonly referred to as the “Back End” of the system. The regular pages of the system seen by visitors are called the “Front End”; the Back End is used by Administrators and content creators to modify the site.

The main screen defaults to some status information. The useful part is the menu down the left side. These links bring up various screens make modifications, including editing your pages.
Note that you are seeing a subset of the full Administration menu. Hopefully you don’t need to worry about making some change which crashes the site 😛
Instruction Pages
Clicking the Posts page brings up a list of the posts within the system.

WordPress was originally designed to create blogging sites. Blog entries are called Posts. In our site we do not have a need for Posts, so I am using them to document the system for future webmasters. I am calling the posts “Instructions”. I create various Instructions to describe how I am organizing images, and a lot of technical clues as to how the site is configured. The article you are reading is an Instruction post.
The list you see are the various Instructions I have created. Hovering over an entry shows some actions below it; in the example the cursor is hovering over the FTP Accounts post. The only action here is to View the post. This brings up the Instruction page for viewing. You cannot edit the page, just view it.
Note: Instructions are also viewable using the SAC menu item Site Configuration / Instructions, instead of going through the Dashboard.
Other than this article, I don’t expect many of the other Instructions to be pertinent. The Newsletter Editor may be interested in the FTP Accounts article for uploading newsletters.
Your Pages
Back to the Dashboard. Clicking the Pages menu button brings up a list of pages assigned to your control.

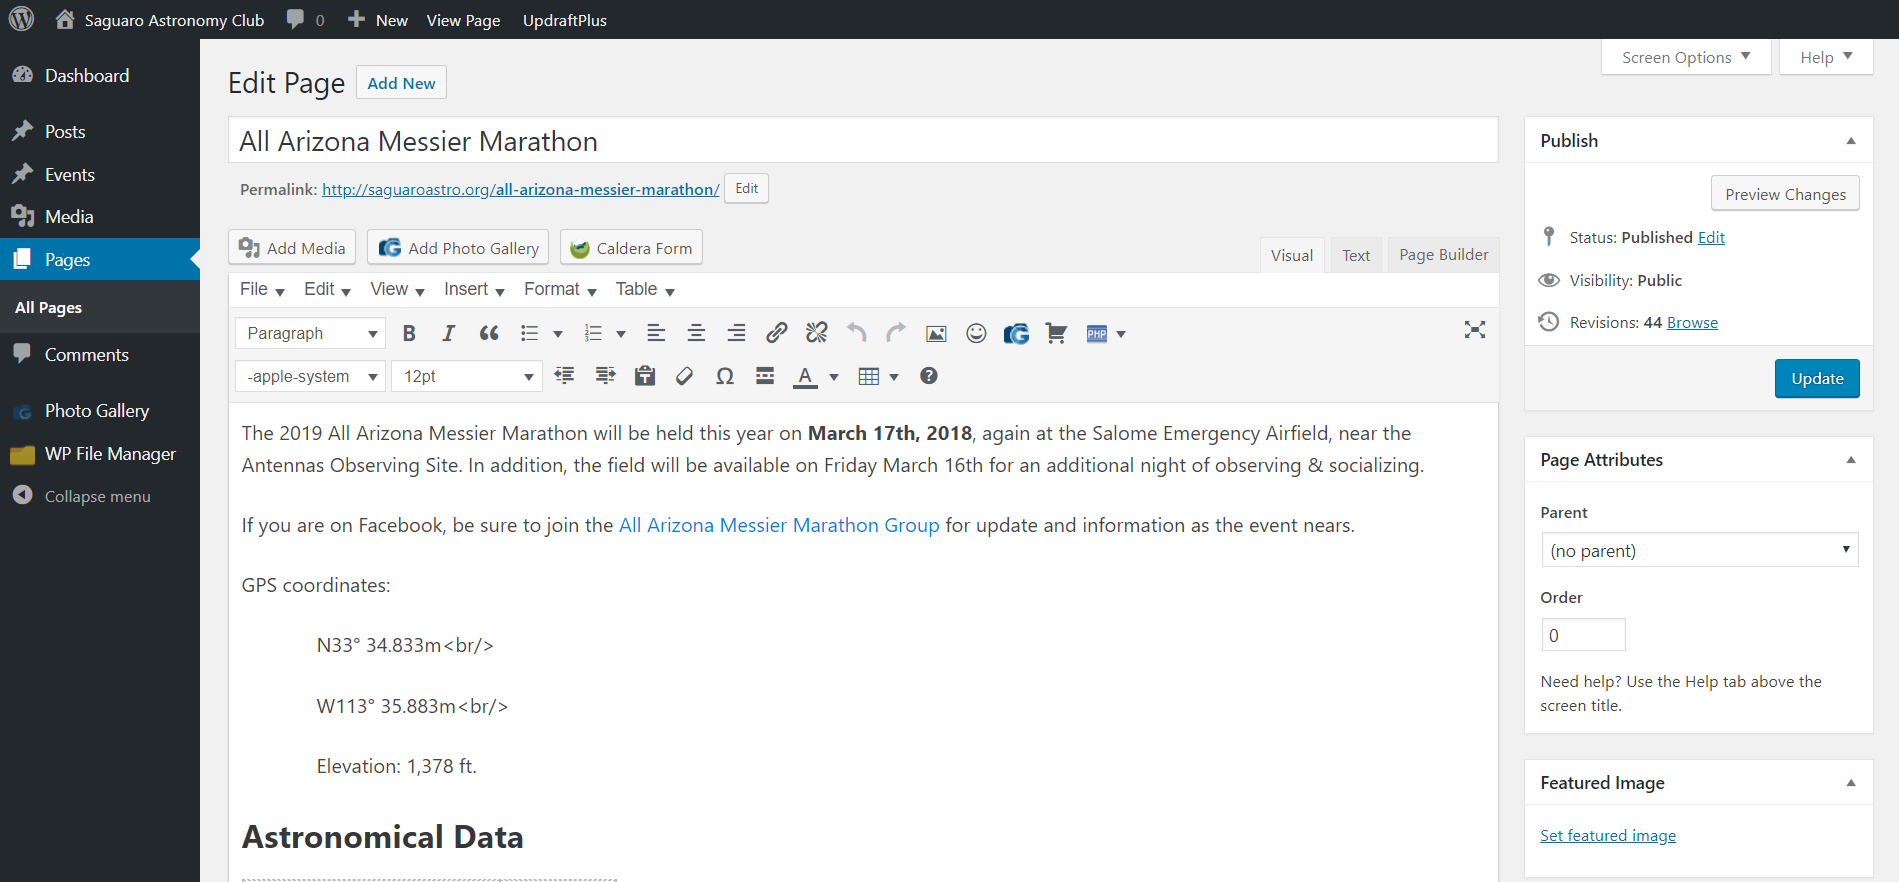
In this example the All Arizona Messier Marathon Coordinator has the main description page, and several pages listing past results. I don’t know why he would need to edit past results, maybe someone found an error?
He will definitely need to edit the main page. In the past we created separate pages for each new year, typically by copying the prior year’s page and making a few modifications for date, etc. This led to a profusion of unused pages which are never needed. The site never links to the old pages. They just clutter up the system.
Now, just edit the main page to make whatever modifications are desired. That page stays in continuous use.
The example shows the actions available by hovering over the main page. Normally you would click Edit to make changes to the page.
Editor
When you Edit a page you are using the TinyMCE editor. This WYSIWYG editor is pretty common now on various web platforms. It has a number of buttons providing simple editing capabilities.
There are also a number of locations on the screen for special functions, security issues, and so on. You are unlikely to need most of these.
Use the Update button to save your changes when you have everything just right.
Visual Mode
The editor works in two main modes. The example shows the Visual mode (notice the Visual tab above the text is selected), which is what you will normally want. This is the WYSIWYG mode; as you make changes you see the resulting page. You do not see the resulting HTML code generated. Especially for making minor changes to existing pages, this mode will be all that is needed.
NOTE: sometimes things do not display accurately in this view. This is because CSS code can be entered in various places in the system to change the styling of the page. This editor does not know about these other sources of CSS.
Text Mode

Selecting the Text tab presents the page in Text mode. Here you see the full HTML code.
This mode is useful if you are adding something tricky, or if you don’t know why the page is displaying like it is. When you make changes here you can then flip back to Visual mode to see what it looks like.
NOTE: WordPress reformats the HTML code in some ways. For example, if you put indentation in your HTML that white space will be removed.
Preview Changes
As you make changes, you may wish to check the actual appearance of the page. There are several ways to do this.
Option 1: Click the Preview button at the top of the page. A new browser tab will come up with your page. If you subsequently make changes to the content, you need to Preview into another page to see the changes. The first Preview will not reflect your changes.
Option 2: Update the page (saving your changes). Now there is a link “Visit page” at the upper left of the screen. Bring this up in a separate browser tab to see the new page. Now you can make additional change to the page in the first browser tab, then go back to this tab and refresh the page to see the new changes.
Option 3: Open a separate browser tab with the page loaded as normal (for example, by using the site menus to visit the page). Now edit the page in your editor tab, Update your changes, then switch back to the normal page and refresh the page.
File Manager
You may wish to upload files from your computer to the site. These might be images or pdf documents, for example. One can use ftp to do this, and this can be the best approach if you have a large volume. However, I have implemented a convenient File Manager to make this simple.
Please read the Instruction page Image File Organization for a discussion on where to put these files. It is important we not clutter the system with files stuck all over the place.

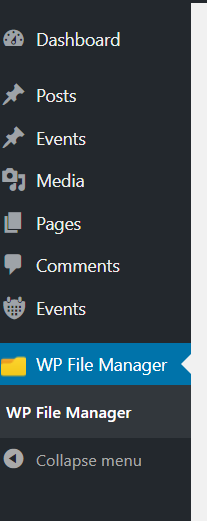
Method 1: Website Menu
Use the site menu as shown to bring up File Manager.
Method 2: Dashboard Menu
The Dashboard menu also provides a link to the File Manager.
Logging Out
When you are done with your changes you can log out to return to the web site as normal. Use the menu item Log Out under your name at the upper right part of the black bar.
Depending on your browser,
- you may get a screen asking if you really want to log out.
- you may be returned directly to the site home page, or you may be returned to a login screen.
Need Help?
Of course, if you have problems or are uncertain how to do something, the webmaster is available to help out.
You may need extra pages created and linked to the system menus, which would also require webmaster involvement.